
Vibe Coding 101: 23 practical tips to build functional prototypes
After vibe coding for 8 months, here are some of my hard-won lessons. If you're starting out on your vibe-coding journey as a PM or PMM, this guide will help you avoid common traps.

Product management is in the middle of one of the biggest shifts after a long time:
Vibe coding is quickly becoming a core PM expectation.
Multiple candidates have reported that Google recently added a vibe coding interview to its PM interview process. Aakash Gupta covered this in detail in his newsletter.
Shortly thereafter, Kaz from Shopify announced something similar:

Given the tech world's tendency to copy SV Big Tech, this trend isn’t likely to stop.
My prediction: within 12 months, vibe-coding-style assessments will be standard across mid-to-large product orgs.
Vibe coding is here to stay.
It’s not without merit, though. At vFairs, switching to Lovable-driven prototypes made PM to engineering conversations clearer and cut spec-finalization time.
But here’s what I fear: if teams misuse it to skip real discovery and jam out features, we'll end up with more bloated apps that nobody loves. We’ll create a new hamster wheel of prototypes that look super cool in theory, but solve low-value problems, are complex to monetize, or tedious to take to production.
In any case, if you’re a Product Manager (or even a Product Marketer), it’s best to start preparing for this shift early and get better at the craft.
In this edition of Behind Product Lines, we’ll go through practical tips around starting a vibe coding.
I want to add a caveat here.
This article is NOT meant to teach you to build production-ready full-stack apps with top-notch security. I feel folks with engineering backgrounds can better explain that.
For production-grade patterns, lean on software engineers’ guides. In fact, Pawel Huryn has some great content around this.
This edition will focus on functional prototypes and proof-of-concepts with topics like:
basic fundamentals to get right
prompting techniques to get better results
tips to get better at design aesthetics
how to go about integrating APIs
best practices around databases and more
Now, you might be wondering what kind of experience I have to talk about vibe coding. Good question.
My Vibe Coding Journey
I spent the last 8 months building internal tools and proof-of-concepts for the company I work for, as well as some pet projects.
Some examples:
Homepare (homepage messaging comparison tool - see video here)
vouchtribe.com (lets you create a shareable directory of people whom you vouch for - see video here)
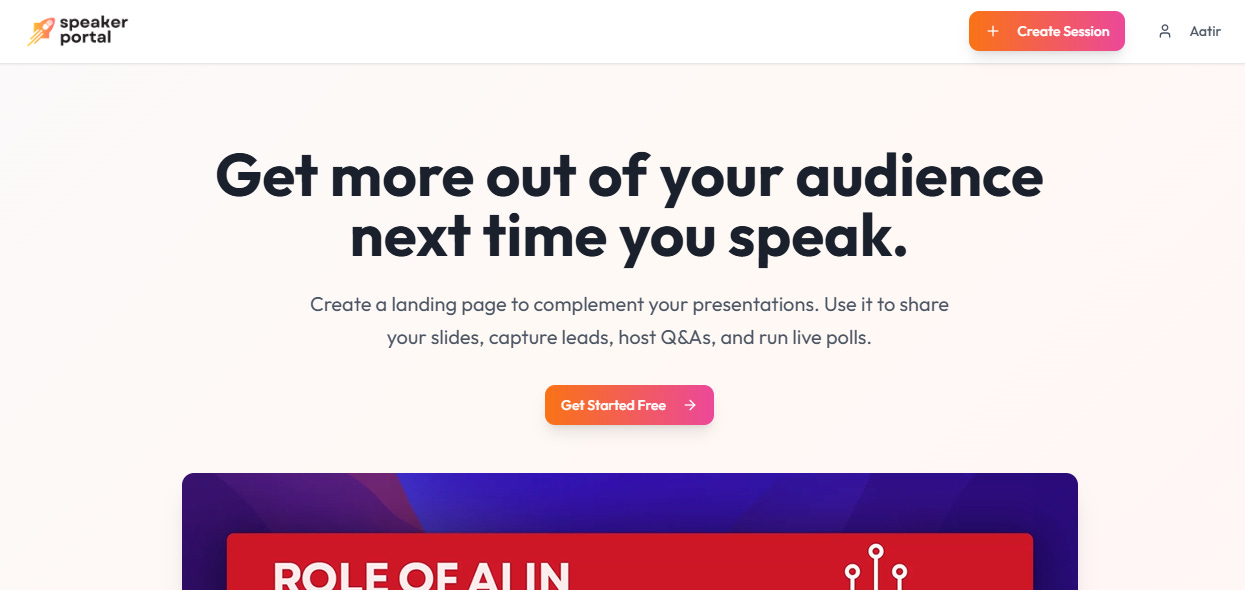
speakerportal.io (helps event speakers create landing pages to share resources & conduct polls with live attendees)

event booth kiosk visualizer (see video here),
a social walls product that pulls LinkedIn posts into Pinterest-style boards. (watch the video here)

a hybrid RAG assistant integrated with Slack to help my sales folks find sales assets and frame pricing quotes
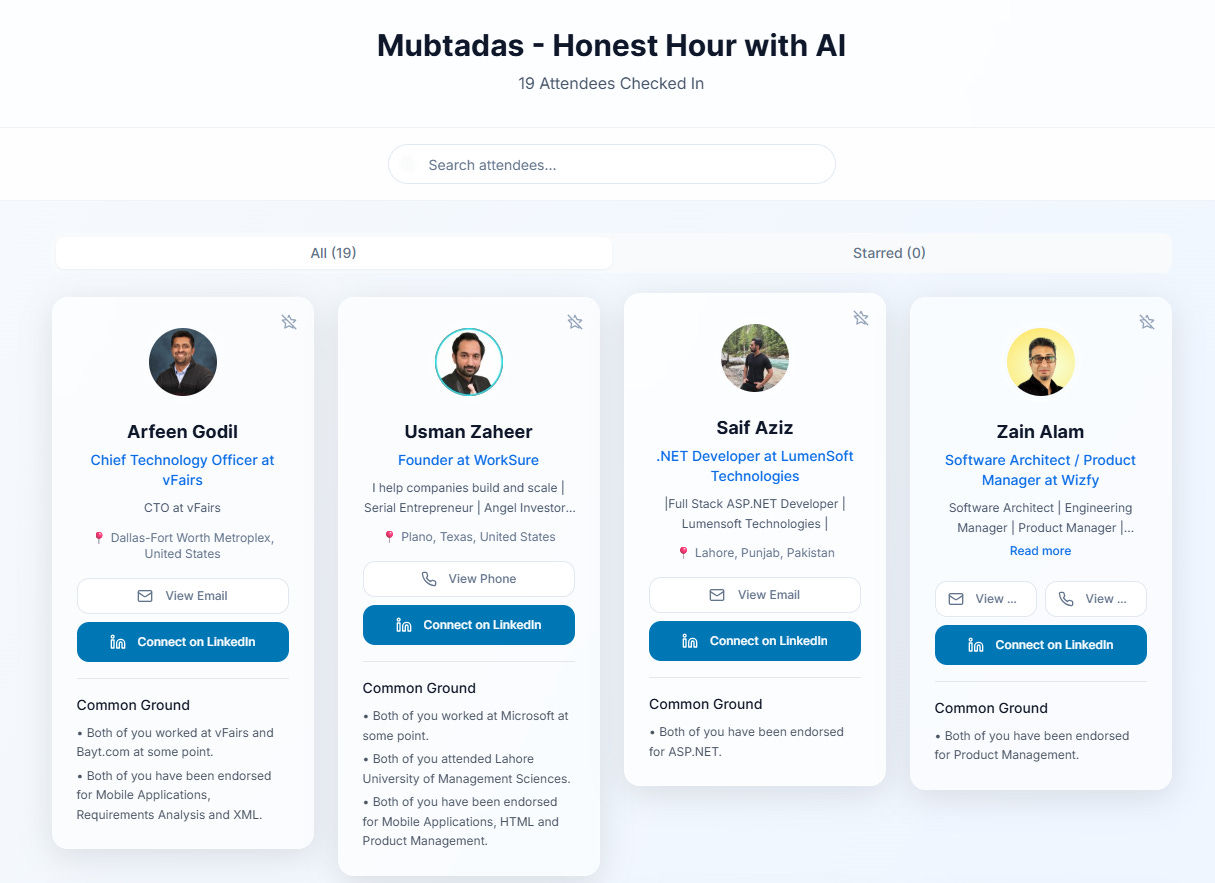
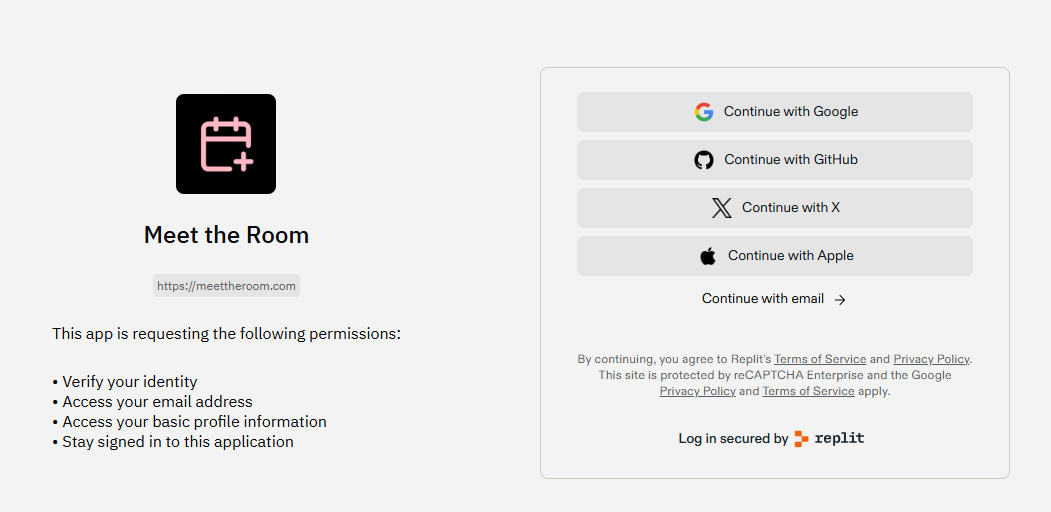
Meet the Room - an event networking app that allows attendees at an event to see who else is attending and what they share in common with them.
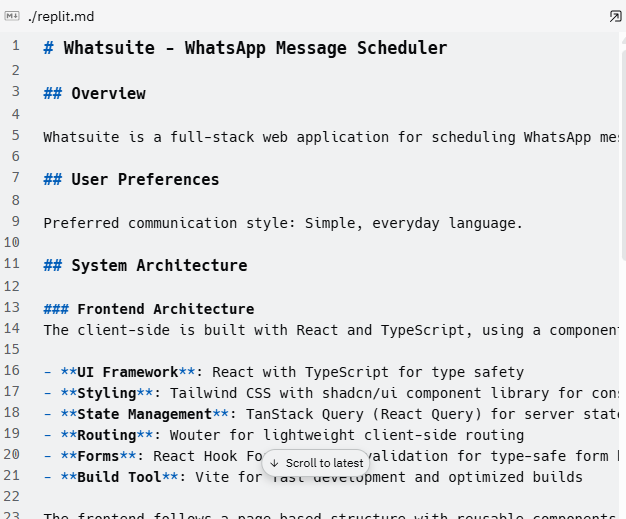
[Current] I’m currently working on a personal tool called Whatsuite (a content scheduling tool, but for Whatsapp Communities)


Note these were functional prototypes with integrated APIs and working code (not pretty mockups). This is in addition to several internal deliverables I submitted for vFairs to visualize new features and enhancements.
I might not be an elite expert, but my purpose is to package my lessons that would have saved me hundreds of hours and mindless frustration when I started. Every tip may not apply to you, and I might uncover something better in a few months. That’s how it is with AI these days.
One final thing before we begin: I need to kill a myth.
Myth: “Vibe coding allows you to develop at the speed of thought.”
I’m not sure who came up with that metaphor, but I feel that’s misleading.
Yes, the first few prompts produce magical results. You can get away with a quick mockup without breaking a sweat. It gets addictive.
But as soon as the app reaches a certain complexity threshold, progress gets stifled unless you know what you’re doing. Prompting plays a significant role in making your AI get dumber:
")
Also, don’t think it’s less work.
There’s a considerable amount of planning, decomposing, and micro-decisions that go into building a functional prototype.
If you’re hoping for hacks that will help you one-shot solid deliverables, then this isn’t for you.
Enough talk. Let’s go.
My Tech Stack
Let me first share what I actually use when building apps to give you context. Your stack might look different, and that’s perfectly fine.
This is what works for me:
Core Building Tools
Replit (Core plan) - This is where I build most apps. The AI agent handles both frontend and backend without switching between tools. The main benefit is one-click deployment and integrated databases.
Lovable (plan: 400 credits/month) - Ideal for when I need a polished frontend quickly. Great for React apps that are heavy on the user interface.
Cursor (paid) - When I need to get into heavier backend work or want more control over the code structure.
Planning and Design
ChatGPT/Claude - I use these for brainstorming app ideas, planning features, and working through design problems before I start building.
Infrastructure and Hosting
Supabase (paid) - My database choice. Works well with all the AI tools and handles file storage without headaches. It also supports vector databases.
N8N (self-hosted) - For building workflow automations that connect different parts of my apps.
Render (basic plan) - Hosts my N8N workflows reliably.
Vercel - I uses this to deploy my Lovable apps.
GitHub - Keeps track of code changes and backs everything up.
This stack covers most scenarios I run into. Although some tools overlap in their capabilities, having options allows me to select the most suitable tool for each project.
1. Plan First, Code Later
When I first dove into vibe coding, I’d fire up Replit with a half-baked idea and start hammering prompts.
Three hours later, I’d hit a wall, thinking, “I could rebuild this faster from scratch.” Sound familiar?
The tool wasn’t the problem. It was I who skipped the most critical step: planning.
Spending time upfront mapping out your app saves you from a world of pain later.
Here’s how to get it right:
a) Brainstorm the plan with an LLM
Before you touch Replit or Lovable, grab ChatGPT, Grok, or Claude and hash out what you’re actually building. This feels like a slog at first, but it pays off.
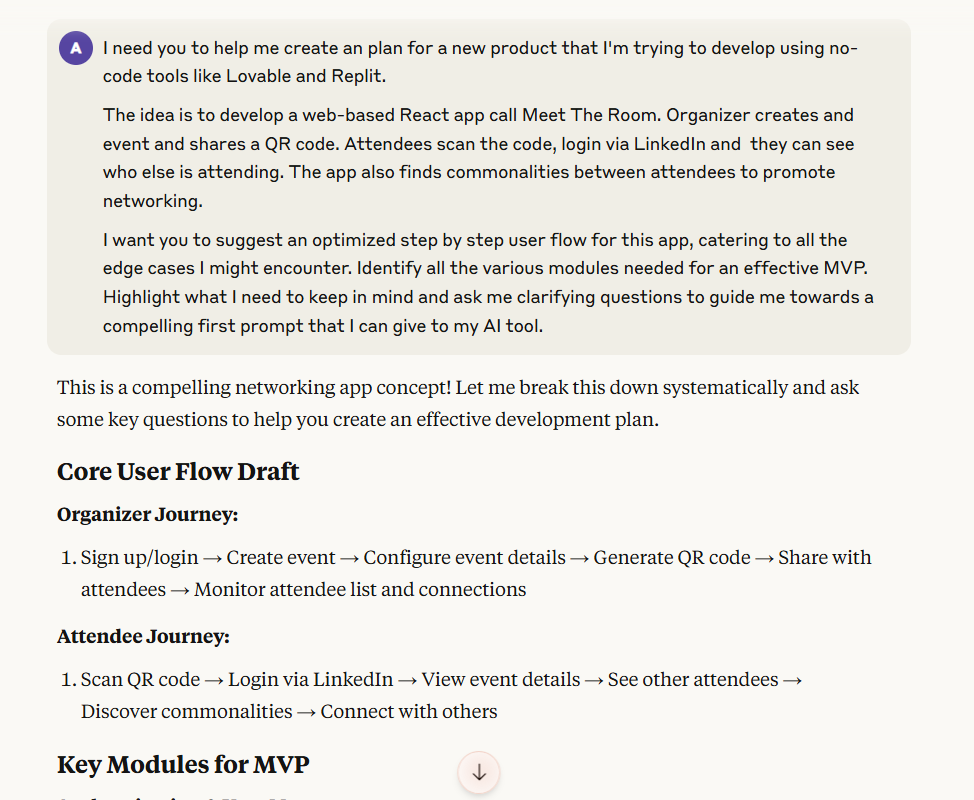
Define main use cases: What will users do in your app? Spell it out.
Hunt for edge cases: Ask your AI to poke holes in your idea.
Lock core requirements: You can tweak features later, but flipping foundational decisions mid-build is a mess. I learned this the hard way with VouchTribe. Halfway through, I attempted to convert a single-user tool into a multi-tenant SaaS. The code wasn’t built for it, it turned into a hot mess, and I ended up starting over.
b) Draft a lightweight requirements.md
Don’t let ChatGPT overengineer your prompt. Instead, ask it to whip up a clear outline and requirements doc first. Then:
Create a requirements.md file: Save it in your project folder after your first prompt is set.

Reference it constantly: Feed it back to your AI tools or drop it in the context window to keep everyone on the same page. This is handy when you start new chats.
Use it across tools: If you switch from Replit to Cursor, this doc saves you from re-explaining everything.
c) Nail the first prompt
Prompting is the heart of vibe coding, so make your first one count. A sloppy start leads to an unwieldy app.
Here’s my go-to prompt structure:
App category: What kind of product is this?
Primary use case and audience: Who’s using it and why?
User types: Critical for multi-sided platforms.
Starting features: What to build first.
Design needs: Any specific UI vibes or constraints?
Give the AI a high-level view of your project before diving into specifics.
❌ “Make a dashboard with two buttons.”
✅ “Build a project management tool for small teams...”
Context helps the AI nail structure and also empowers it to give better suggestions.
Some real examples
For my WhatsApp scheduling tool:
I want a multi-tenant WhatsApp message scheduling app. Users schedule messages with their phone number for WhatsApp groups and contacts. Start with: a login page with dummy credentials, a content calendar showing the next 7 days...
For a simpler kiosk visualizer:
Create a tool for event management software customers to visualize branded badge printing kiosks in a conference setting. Flow: User uploads logo, enters event name, picks from a kiosk template library...
Template:
I need a [product category] app with these core features: [list capabilities]. Start with: a login page with dummy credentials, a dashboard showing [relevant info], a button to create a new [record type]. Before coding, give me a detailed plan of what you’ll build.
I’ve seen some folks like to specify the tech stack in the first prompt as well. I’m sure this would be super handy if you’re an engineer who needs to govern the tech stack.
But apart from that, you can let the AI pick the tech. Lovable and Replit default to solid choices like React with Tailwind CSS. Only get picky if you need something like server-side rendering for SEO.
d) Approve a phased build plan
Both Replit and Lovable can show you their game plan before coding starts. Lean into this.
Replit’s plan designer: It lays out a roadmap based on your prompt and asks for your green light. I tend to iterate here as much as possible.

Lovable’s phased plans: Prompt it with, “Create a phased plan for this app. Break it into small, independent components and suggest the build sequence.”
Build small: Stick to 1-2 modules at a time. Resist the urge to boil the ocean unless your app is dead simple.
Talk user flows: I use arrow symbols to keep things crystal clear, like: “User clicks login button → authentication → dashboard → filter options → results page → save functionality.”
Tldr: A killer first prompt and a tight plan are your secret weapons for getting a vibe coding project on the right track.
Recommended Resources
Lovable’s prompting guide: https://docs.lovable.dev/prompting/prompting-one
Replit prompting tips: https://www.linkedin.com/posts/matt-palmer_tips-tricks-for-prompting-the-replit-agent-activity-7258155108784308224-hRl_/
2. Develop one feature at a time using test cases
I've found that vibe coding for me happens in four different pulses, and I handle each one differently.
a) New feature requests
I break it down and keep the scope tight. At the end of my prompt, I give a list of test cases I want the AI to pass.
Here's how I approached a user profile feature:
"Build a user profile editing feature that allows users to update their name, email, and avatar. Test cases I want you to pass: User can save changes successfully, form validates email format, avatar upload shows preview before saving, changes persist after page refresh, error messages appear for invalid inputs."
This approach has helped me signal what's important to build. It’s also easy to reference which test case failed in the subsequent prompt rather than having to spell out the entire feature again.
b) Tinkering with small enhancements
I've learned I can combine simple tweaks without much risk.
When I need button placement changes, simple logic updates, or minor navigational adjustments, I batch them together.
But I limit myself to 3 or 4 items maximum. I don't bother with separate prompts for each small change.
c) Bouquet of bug fixes
I always attack the easy ones first, usually cosmetic issues. I can safely combine these.
But when I hit a sizable problem like a deep logical issue, API response parsing trouble, or AI generation problems, I handle that separately. I've started spawning new chats for complex bugs.
I learned the hard way that mixing bugs of different scopes in the same prompt never ends well. We'll talk about those "Dory" loops later.
d) Deep debugging cycles
This gets its own focused approach, which I'll cover next.
3. How to break out of “Dory” loops
Every vibe coder has experienced this: you get stuck on a bug and Replit or Lovable keeps claiming they've fixed it, but the problem persists.
People claim it “lies”. I’ve been frustrated with that too:
These AI tools can be convincingly confident about fixes that weren’t implemented. And you'll burn hundreds of credits while the most trivial bugs refuse to die. Sometimes they'll even break your working code in the process.
I affectionately call these "Dory loops".
A dory loop is when the AI keeps swimming aimlessly with unhinged enthusiasm, thinking it's done a great job, while in reality, it has made no real progress.
Or, it’s made matters worse but fails to confess.

Here’s how I’ve gone about fixing them:
Approach 1: Provide fresh context every time
The worst thing you can do is keep prompting "fix the bug" without new information. It’s ok to do that once, but then the AI needs fresh context to break out of its loop. Some ideas:
Check the system console first - Look for actual error messages you can share
Add debugging and logging - Ask the AI to instrument the problem area with console logs
Take screenshots - Visual context helps the AI understand what's actually happening
Explain the user flow in detail - Walk through exactly what you're doing when the bug appears
Suggest specific areas - If you're slightly technical, point to routes or API calls where the problem might be
If that doesn’t work, I move to the next approach.
Approach 2: Summon extra brainpower
On Replit, turn on extended thinking or use the high-power model to see if it can bulldoze through stubborn problems. Ask it to deeply inspect the issue and provide three likely scenarios that could cause this problem.
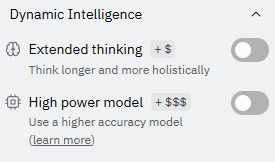
This burns more credits, but it gives you three specific directions to push the AI toward instead of random guessing.
If that fails, then I call on the heavy-hitter Avenger: Cursor.
Approach 3: Solve it in Cursor
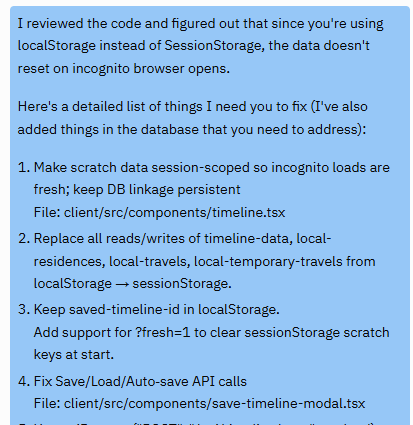
I recently connected Replit with Cursor through SSH. If SSH isn't an option for you, you can commit the code to GitHub, clone it in Cursor, explain the codebase a bit, and explain the issue using the o3 or Gemini model. I talk about this a bit later again.
I've also started using Claude Code for particularly nasty bugs. Once it detects the issue, I ask it to provide the exact prompt I need for Replit or Lovable if I want to continue there.
These approaches have helped me steamroll through sticky Dory loops.
Approach 4: Roll Back after 3 failed attempts
Follow the rule of 3. After three failed attempts (with fresh context), roll back to the last good commit, split the problem, and re-prompt in smaller steps.
Once you roll back, do NOT use the same prompt again.
Break down your plan into smaller, manageable chunks and tackle each step at a time, preempting potential issues with the tool.
Rollbacks are so underrated. They should be used more often to prevent overspending on credits.
Sometimes the fastest way forward is going backward first.
4. Keep committing to Github
Remember when Replit deleted Jason Lemkin's production database without remorse?

While code versioning won’t help you prevent a database wipe (you need to create DB backups for that), it will create a failsafe if your AI decides to wipe out a significant chunk of code. (which is more plausible)
Losing your codebase might seem like a rare occurrence, but it can happen.
So, as you start out, connect your project to GitHub immediately. This isn't optional developer stuff. It's basic protection for your work.
Also, when you save progress, write comments that actually mean something.
"Fixed bug" tells you nothing three weeks later.
"Added user authentication flow" helps you understand what changed.
How Each Tool Handles GitHub
Lovable makes this easy. GitHub syncs with near-real-time updates, and you can push/pull both ways. You can set this up following their documentation: https://docs.lovable.dev/integrations/github
Replit and Cursor require manual commits. You need to tell the AI agent to commit your changes or do it yourself through their interface. For Replit specifically, this video walks through the GitHub connection and execution process.
Note: if you’re launching your proof-of-concept to a small user base, you will need a way to separate staging and production. Pawel Huryn’s article on this is a must-read in that case.
5. Manage business logic in n8n
When I started vibe coding, I put all my business logic inside Lovable and Replit.
I'd constantly ask the AI agent to fix workflows or explain what was happening in the code. It felt like I was flying blind.
Big mistake.
The solution?
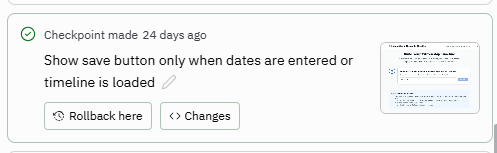
Move your core business logic to a separate backend. I prefer n8n. I build my workflows there visually and expose it through webhooks. My Replit or Lovable app then calls the webhook and gets clean data back.
Why This Separation Works
Take my Social Wall app as an example. Instead of asking Lovable to handle LinkedIn API calls directly, I built an n8n workflow that grabbed the data, cleaned it up, and returned a simple JSON response. Lovable just called the API, stored the results and rendered it.
This approach gives you several advantages:
Visual control - You can see your business logic in n8n's flow chart format.
Easy debugging - n8n shows you execution history for every workflow run.
Better testing - You can test workflows independently before connecting them to your app
I would recommend self-hosting the community edition of n8n instead of the cloud version. Self-hosting avoids per-execution platform fees and gives you execution history + visual debugging.
Getting Started Resources
If you're new to combining Lovable with N8N, this beginner tutorial covers the basics:
For N8N tutorials in general, follow Nate Herk's YouTube channel. His explanations are clear and practical.
To self-host N8N, watch this tutorial that walks through the setup (I used the Render section).
Moving business logic to N8N might feel like extra work upfront, but it makes debugging and expanding your app much easier later.
6. Build Authentication Early
Here's a mistake that cost me hours of refactoring: leaving authentication until the end.
Adding login systems after your app is built means restructuring everything to wrap permissions around existing features. It's a massive headache.
Build authentication early, even if it's just a placeholder.
The easiest way to get going is asking Replit or Lovable to build you an authentication system but with a simple login page and hard-coded admin credentials to begin with.
But once you need proper authentication flows, you have solid options:
Supabase Auth works well with Lovable and Replit. You can set up email verification flows where users get a link to complete signup. Here’s quick tutorial on that.
Just remember that if you want to customize the email templates for these emails, you will need to go Supabase's authentication settings. Firebase Auth is another reliable choice with similar capabilities.

OTP Authentication is possible too.
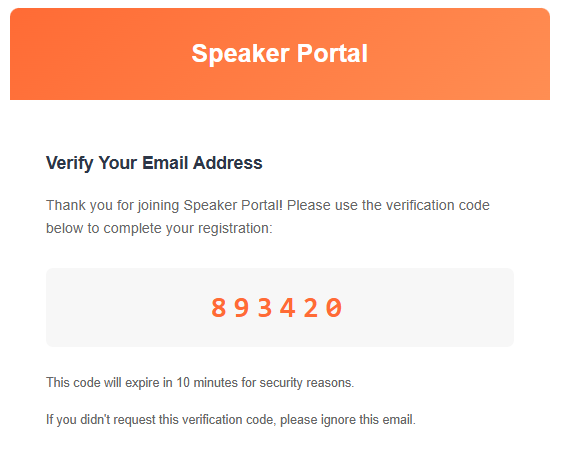
Here’s a little tip: for lightweight setups, ask Replit to implement the Nodemailer library.
I got a working OTP system for SpeakerPortal running in just a few minutes using this.
You can use your Gmail address as the sender party, and all it needs is SMTP details and password. It’s not the most secure option, but for simple prototypes, it does the job. (store these in environment creds though)
Here’s the default email template I got setup with:
For something more robust, use Resend API.
Replit's Built-In Auth
Replit has its own authentication system. Anyone with a Replit account can sign into your app. It's quick to set up and works fine for single-user apps or internal tools.
The downside? Replacing it later becomes messy. If you think you'll need Google OAuth or other providers down the road, skip Replit auth from the start.
Google OAuth Setup
Google OAuth is powerful, but it can be unwieldy to configure. You'll need to set up a Google Cloud project, configure the consent screen, add authorized domains, and set redirect URLs properly.
If you're going this route, Supabase's documentation walks through the process: https://supabase.com/docs/guides/auth/social-login/auth-google
This video tutorial shows how to set up Lovable with Google OAuth:
Whatever authentication method you choose, implement it early. Your future self will thank you.
7. Use the AI Agent for design advice
You're already chatting with ChatGPT or Claude for user flows, but here's what most people miss: your AI coding tool already knows your entire project. Instead of making design decisions on a whim, ask it for advice.
Turn on chat mode in Lovable or open the chat in Cursor. Tell it the design problem you're facing and ask for solutions within your current constraints.
The AI often suggests two or three alternatives you hadn't considered, and they're usually more straightforward to implement because the tool knows what you're already working with.
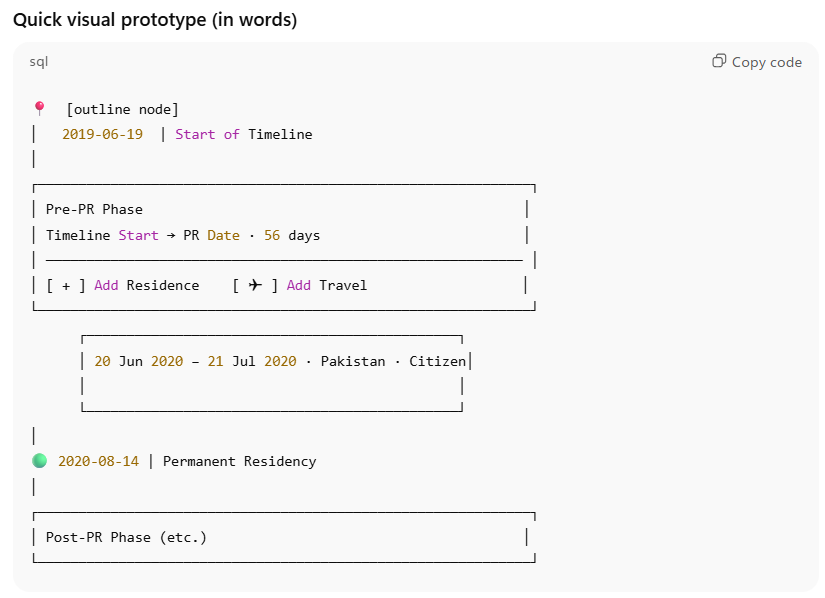
One of my favorite features is when Lovable or Replit sketches little wireframes in the chat window. They'll show you user flows or navigation structures right there in the conversation.
I was experimenting with a little app that helps with creating citizenship timelines, and it suggested me this timeline structure in the chat window:
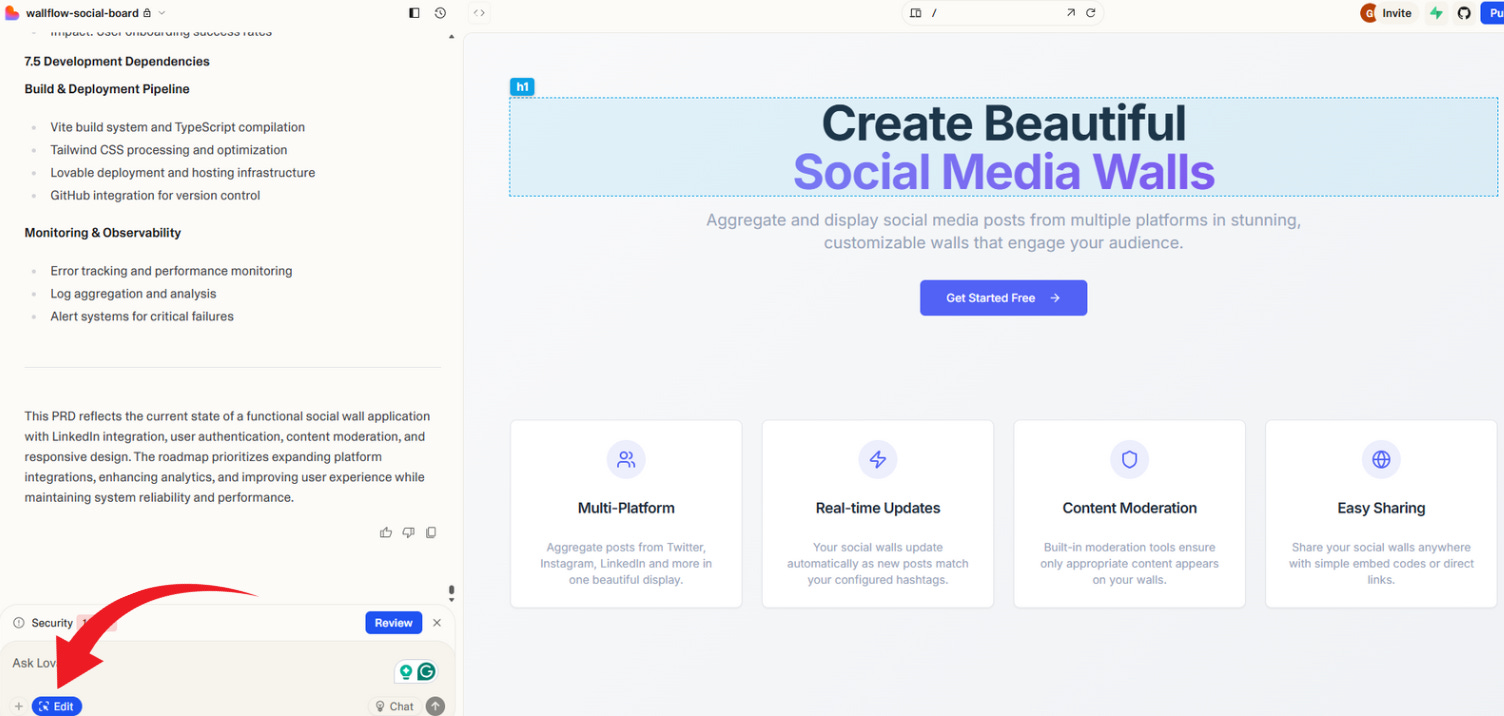
When I was building my Social Walls app, I got stuck on designing a modal for configuring different social networks with different criteria. Instead of struggling through it alone, I asked Lovable for help. It came back with a simple back-of-napkin solution that I could implement immediately.
Your AI coding tool has an advantage over ChatGPT and Claude. It provides full project context. And they're surprisingly good design advisors when you give them the right prompt.
8. Use the App builder for Documentation
After you've built a prototype, someone else will need to understand it. Maybe you're handing it off to engineers for production. Maybe designers need to polish the interface. Or maybe you just need a lightweight PRD that people will actually read.
Fact is, your AI tool already knows everything about your app. It has full context on what you built and why. Use that to your advantage.
Instead of staring at a blank document, prompt your AI tool with this:
"Act as a highly seasoned Product Manager. Based on what you know about the app we've just built out, produce the following sections that I can put into a PRD: user scenarios, functional requirements, scope (in vs. out), assumptions, analytics, dependencies, external integrations, email triggers, APIs and workflows."
This approach saves you from having to reconstruct your app's logic from memory. The AI has been with you through every iteration. It knows which features made it in, which got cut, and why certain decisions were made.
Watch a little video demo I made for this.
Documentation doesn't have to be a separate chore you do after building. Your AI tool can handle the heavy lifting while the context is still fresh.
9. Create a separate API key for each app
This might sound like overkill and trivial, but it’s often overlooked.
I would advise not to use the same OpenAI, Claude, or other platform’s API key across multiple apps. Create a separate key for each project.
Apart from being a security best practice, when you use the same key everywhere, you can't tell which app is burning through your tokens.
Your bill shows a massive number with no breakdown, preventing you from fixing the leak. You end up going into each app and looking at logs to locate the issue.
At one point, I had five different prototypes all sharing one API key. When my OpenAI bill spiked, I had no idea which app was the culprit. Worse, when I accidentally regenerated the key while debugging one app, all five apps stopped working at once.
It takes two extra minutes upfront, but saves hours of confusion when things go wrong.
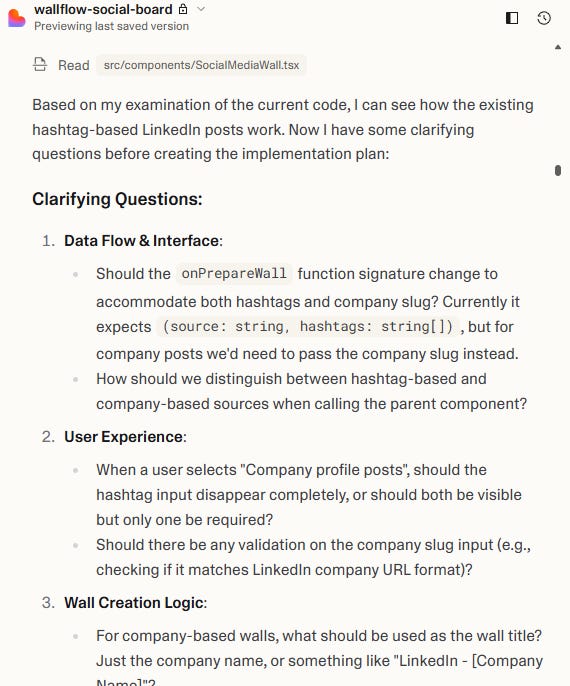
10. Force the chat agent to get clarifications
This is hands down my biggest unlock since I started vibe coding.
When I need to implement something even slightly complex or I’m debugging something, I use this magic phrase: "Ask me clarifying questions before implementing it."
This simple addition to your prompt does three powerful things:
Catches misunderstandings early - The AI shows you what it thinks you want before building the wrong thing
Reveals edge cases - It spots potential user experience problems you hadn't considered
Gives you options - Instead of a blank canvas, you get specific choices to pick from

Several times, the AI's questions have saved me from building features that would create terrible user experiences. It might ask about error states I forgot, or suggest alternative approaches that are simpler to implement.
The best part?
You don't need to write essays in response. Short phrases work fine. The AI gives you structured choices, so you're not starting from nothing.
This prompt technique should be in every vibe coder's toolkit.
11. Combine Superpowers. Be comfortable moving between tools.
Don't get locked into one tool. Each AI assistant has its own unique strengths, and GitHub makes it easy to switch between them without losing progress.
Lovable excels at design. Replit has one-click deployments and native database integrations. Cursor offers advanced debugging and more cerebral firepower for complex problems. Use GitHub as your bridge between them.
Since Lovable auto-syncs with GitHub, you can commit changes there and immediately continue in Cursor. This lets you use Lovable for rapid prototyping and interface work, then switch to Cursor when you hit complex logic or stubborn bugs.
This diagram from Xinran Ma explains it best:
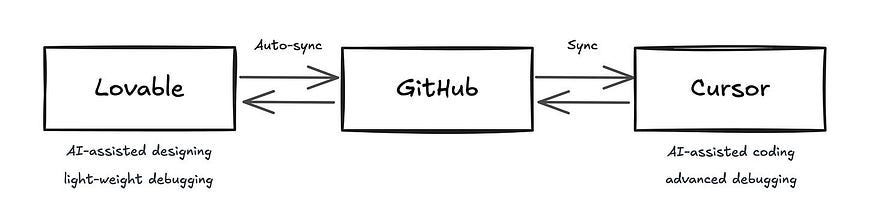
The workflow stays smooth because both tools work with the same codebase through GitHub.
This article walks through the complete setup: https://medium.com/design-bootcamp/lovable-cursor-how-to-set-up-this-powerful-ai-workflow-71aac773194e
Replit Plus Cursor via SSH
Recently, I connected my Replit repositories with Cursor through SSH.
This has been a game-changer for my development pace. I can fix bugs much faster and make steady enhancements.
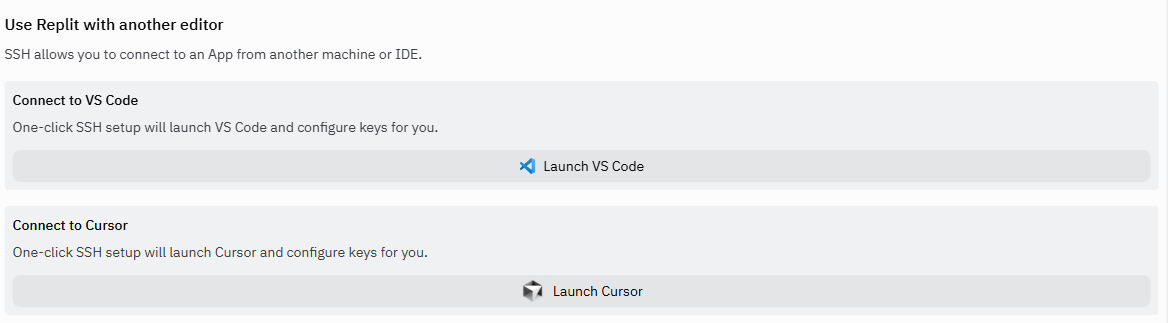
My current workflow: edit through Cursor, review in Replit. Cursor handles the heavy debugging, while Replit gives me a clean interface to test and review changes.
If you need a quick tutorial on how to connect Cursor with Replit, you can check this out:
Don't limit yourself to one tool when you can combine their strengths. GitHub keeps everything in sync, so switching between tools takes seconds.
12. Use the "Edit" Feature for Static Areas
When building marketing sites with static text, such as headlines, descriptions, and buttons, consider stopping the prompts for every minor change. Use the direct editing features instead.
For simple text changes, color tweaks, or spacing adjustments, direct editing is faster and more precise than explaining what you want through prompts.
Lovable's edit button - Click directly on elements to modify them without prompting
Replit's edit feature - Select the specific item that needs fixing, then give targeted prompts
Direct file editing - If you know basic HTML/CSS, just edit the code files directly
Prompting for simple changes creates unnecessary back-and-forth. The AI might misunderstand which headline you mean, or change the wrong shade of blue. Direct editing eliminates that confusion.
Every small prompt costs credits. For a marketing site with dozens of text changes, those micro-prompts add up quickly. Direct editing keeps your credits for the complex stuff that actually needs AI help.
13. Keep a consistent design pattern for collaborative work
Most product managers aren't building prototypes from scratch.
You're enhancing existing products or testing new features.
The challenge? Keeping your Lovable and Replit prototypes consistent with your actual product's design system.
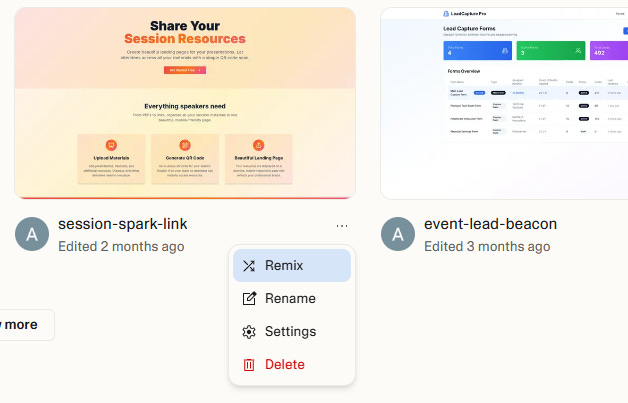
Remix your Lovable app
The simplest way is to create a base template of your existing product in Lovable using screenshots and prompts. Then, once you have a skeleton you can work with, simply ask the product team to keep “remixing” from that template.
You can go to the dashboard where you see all your Lovable files, click on the three dots, and hit Remix.
As of this writing (Sept 2025), you can’t quite remix Lovable files with a Supabase integration. I ran into that snag a while ago.
But Replit has a “Remix” feature too and what I love about their implementation is that they not only copy over the code but also the entire environment. They reset the secret tokens and database credentials (understandable) but once you’ve added them in, you’re good to go again.
Using Github to create copies
I found the Github-as-the-middleman route useful in some of my projects too. You can effectively create a base template of your app using this workflow:
Take screenshots of your current SaaS product
Upload them to Lovable or Replit with prompts like "Recreate this navigation structure and branding."
Keep prompting till you’ve got a base template you’re happy with.
Create a GitHub repo and make your initial commit.
Share the repo with your team for collaborative development.
Next:
Team members can use Replit or Cursor's GitHub cloning to fork and extend
For Lovable:
Create new project → connect to GitHub → clone the generated repo locally on Cursor → copy your existing design files into it → commit and push to the same repo → Lovable auto-syncs
Use pull requests to merge production-ready changes back to the main branch
This workflow prevents everyone from rebuilding the same foundation components repeatedly.
14. Use proper design descriptors to set the tone
If you’re building a new app from scratch, you can direct the design style by leveraging some descriptive prompts. Crisp descriptors help it "lock in" a look and make better component choices, rather than leaving design to chance.
I used to run out of vocabulary when trying to describe the design of the app I was intending to build, so I created a little library of go-to descriptors to match the type of app I’m building:
Minimalist modern app - Low-noise UI, ample whitespace, few accent colors
Enterprise-neutral - Pragmatic, systematic feel with spacing rhythm and subdued palette
Data-dense, scannable dashboard - Compact tables, sparklines, progressive disclosure
Card-based modular - Atomic cards, grid layouts, quick actions on hover
Mobile-first responsive - Touch targets, fluid grids, stacked layouts that expand
High-contrast accessible - Strong type hierarchy, WCAG AA contrasts, visible focus states
Warm editorial marketing - Larger typography, imagery-led sections, storytelling blocks
Sleek urban dark - Dark surfaces, subtle depth, thin dividers, neon accents
Friendly rounded - Softer corners, cheerful empty states, micro-interactions
Soft-glass depth - Glassmorphism panels, blur effects, layered elevation
Neubrutalist expressive - Bold borders, punchy contrasts, intentional roughness
Trust-first professional - Conservative palette, explicit confirmations, clear audit trails
Civic/USWDS-aligned - Plain language, clear patterns, banner alerts, strong forms
Content-forward creator tool - Media-first canvases, timeline layers, keyboard-centric
Storefront-neutral commerce - Product cards, filters, consistent price and CTA patterns
For example, here’s what happened when I applied a “Warm editorial marketing” to my social wall app:
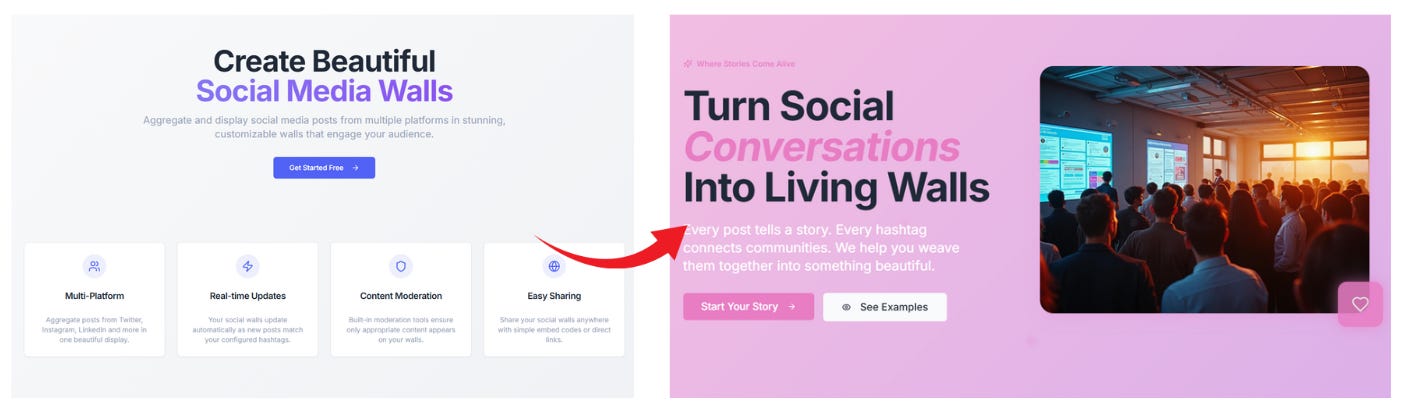
Here are alternates based on the “type of app” you’re creating:
SaaS apps work best with minimalist, enterprise-neutral, or data-dense styles. Focus on accessibility and responsive behavior.
Marketplace apps need card grids with filters, mobile-first flows, and friendly touches without sacrificing clarity.
Government apps should use civic patterns with accessibility as a hard requirement. Prioritize forms, guidance, and trust signals.
Internal tools benefit from enterprise-neutral with dense tables, bulk actions, and keyboard shortcuts.
Moreover, you can reference popular well-known apps as a reference. This is usually a great way to push the design choices in a certain direction.
For example,
Spotify-style - Dark, immersive with bold typography and vibrant accents
Airbnb-style - Clean, minimal, image-led with lots of whitespace
Notion-style - Minimalist document aesthetic with block-based content
Discord-style - Sidebar navigation with dark theme and modular panels
I used a “Whatsapp-style” aesthetic for my Whatsuite app and got this back:
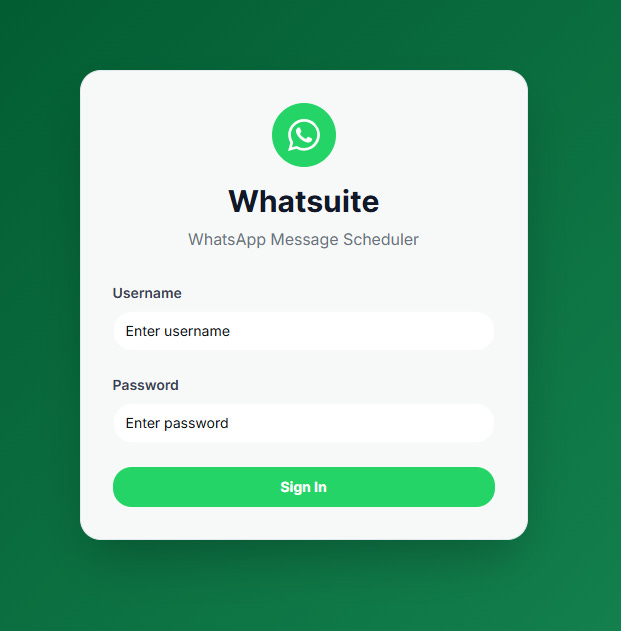
Not bad.
Adding depth to your design description has payoffs in consistency and quality.
15. Specify fonts and color palettes to control aesthetics
Specifying a font directly changes the entire feel of your app. Don't leave this to chance.
Browse Google Fonts and pick one that matches your app's personality.
Tell the AI you want a nice hierarchy of font weights and sizes across your pages. My go-to fonts are Garet and Inter, but choose what fits your project.
Similarly, instead of letting the AI choose random colors, be specific about your palette.
Go to colorhunt.co, find a palette you like, and specify the exact hex codes in your design prompt.
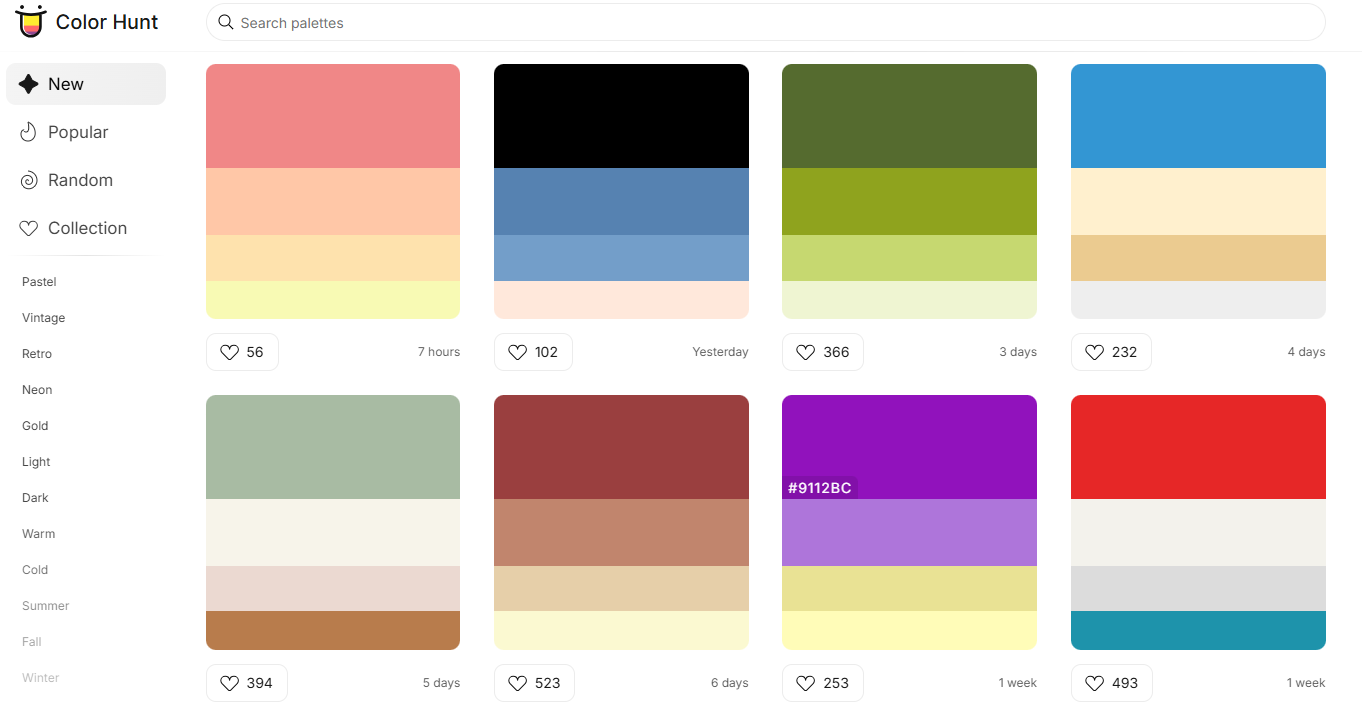
This small detail makes a huge difference in how professional and intentional your app feels.
16. Learn the design component lingo
Apps like Lovable and Replit often start with Tailwind CSS. One thing that helps your prompts is calling out the appropriate component names rather than rambling with long descriptions. It eliminates the back-and-forth guessing.
For example, instead of saying something convoluted like "I want 4 card blocks where the first row has 2 columns, first block is 75% width and next 25%, and the second row has reverse width," just say "I need a two-row Bento grid."
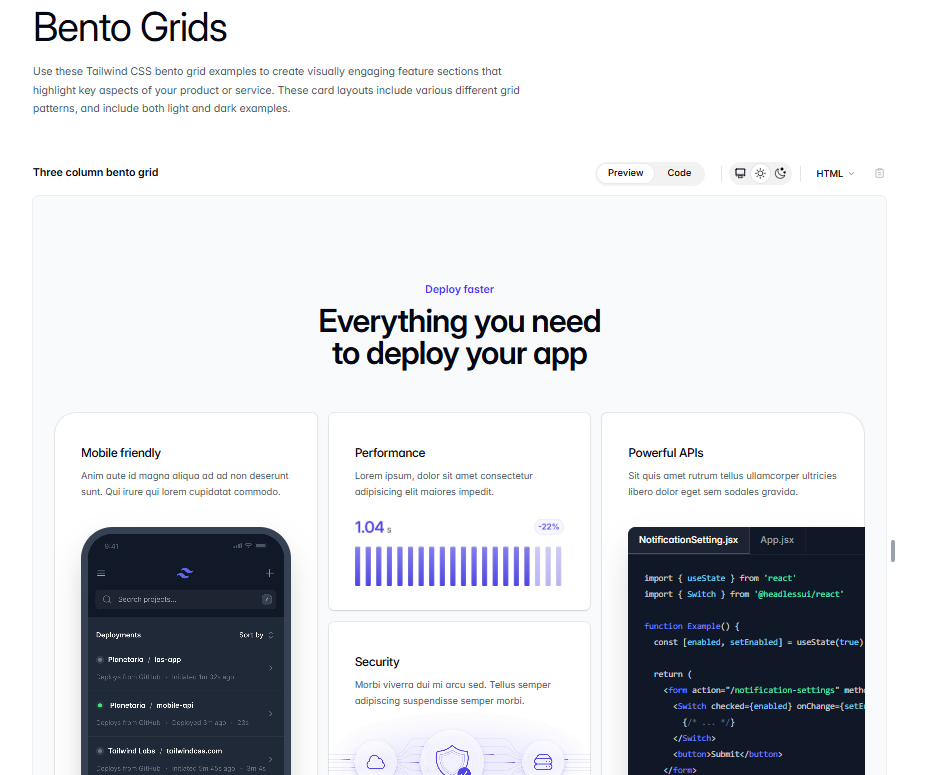
That's the technical name, and the AI knows exactly what you mean.
Other examples:
Flyout menu stacked with footer actions
Combo boxes with indicators
Empty state with dashed border
You can find more component names in the Tailwind library: https://tailwindcss.com/plus
This helps make your prompts shorter/precise and reduces needless iterations.
17. Use curated component libraries
If you want amazing designs built by the community for hero sections, landing pages, or animations, here are two resources that can amp up your design.
21stdev for Component Blocks
Check out 21stdev for tons of blocks like announcements, heroes, and pricing sections. Click on one you like, open the component, hit "copy prompt" (they have options for Lovable, Replit, etc.), then drop that into your AI tool and tell it which component to reskin.

Boom. You have professional-quality components without starting from scratch.
Here’s what it transformed my social wall app to:

Instalanding for Full Landing Pages
Check out Instalanding for complete landing page designs. They have some really cool examples, like neat credit card pages. Copy the prompt and let your AI know to use that design as the foundation.
Super helpful to get a head start.
18. Understand API usage yourself first.
If you're a beginner with RESTful APIs, brush up on how they work. Get comfortable with the differences between GET and POST requests, especially.
Tip: Don't dump documentation links
Yes, if it's a popular API, it might work out on the first attempt (OpenAI is a good example). However, for lesser-known ones, you'll pollute the context with irrelevant information. I’ve wrestled with countless APIs and have been burnt by poor prompting strategy.
Here’s my workflow:
Find the specific API call you need for your use case in the official docs.
Test in Postman first with curl commands using various inputs.
Understand the request and response structure.
If required, create a workflow in N8N to call the API and expose a webhook. Test again.
Prompt your AI tool with clear instructions on the API
How to Structure Your API Prompt
When explaining an API to your AI tool, use this format:
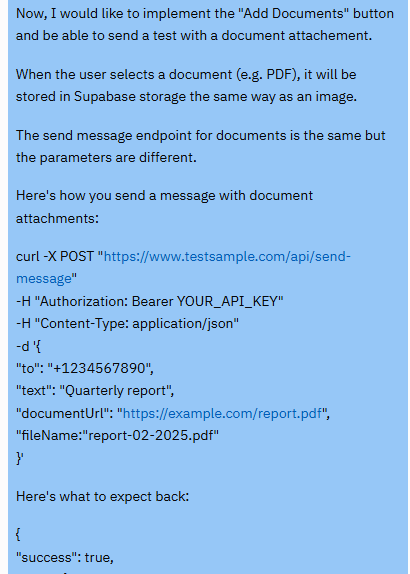
"When the user [conducts some action], you need to call the [API name] API. Below are the full instructions on how to use it. Description of the API:Here's what this API does [brief explanation]. Here’s how you send a request to it: [paste a sample curl command][explain each parameter]. Here’s what to expact back: [paste sample JSON][explain how to parse the data nodes returned].”
If you’re in doubt, ask ChatGPT to help you frame this prompt if you're struggling with the structure. A well-structured API explanation saves hours of back-and-forth debugging.
19. Where to look for helpful APIs
Most tools you work with already have APIs. Notion, JIRA, Asana, Spotify and so on.
Lovable and Replit already know popular APIs like Stripe and OpenAI pretty well, so you can reference those directly in prompts.
But often you need specialized data. Think social media posts, SEO data, LinkedIn data, information about people, companies, or networks.
That’s when you need to turn to API marketplaces.
Best API Marketplaces
RapidAPI - Great for APIs covering tools like G2, LinkedIn, and established services
Apify - Excellent for scrapers on pretty much all social sites and platforms
When you need to pull data from sites without APIs, you can check out:
ScrapingBee - Reliable for general web scraping needs
Firecrawl - Good for structured data extraction
Scrapfly - Another solid option for complex scraping
I've used all three, and they've served me well for different projects.
Also, if you need to look for MCPs (model context protocols) that your n8n workflows could leverage, check out MCP Market.
AI-Powered Search APIs
Perplexity Sonar - Powerful AI search, but costs add up fast
Exa.ai - My absolute favorite, though not cheap. Super flexible in getting structured results back with prompts.
Tavily - Another solid option for AI search.
For maps, I've been using Mapbox which offers lots of customization options compared to basic Google Maps.
All in all, APIs are essential for building truly useful apps. You need to get comfortable with them and know where to find them. Use Reddit as a signal to scout for good ones.
20. Tackling the dreaded CORS Issue
CORS sounds like a disease. It is for beginners like me who are learning to code.
If you've just started, you've probably rammed your head against this in frustration.
What the hell is CORS?
Here's the simple version from ChatGPT:
CORS (Cross-Origin Resource Sharing) is the browser's safety gate. When your frontend is at one origin (like https://yourapp.app) tries to call an API at another origin (like https://api.example.com), the browser first asks the API, "Do you allow this site to talk to you?"
If the API's response headers don't say yes to your site, the browser blocks the call before it ever reaches your JavaScript.
This is why you'll see errors in the console even though your code looks fine.
Vibe coding runs into CORS constantly because you're rapidly wiring browser-based UIs to third-party APIs that were never configured to accept calls directly from random web origins.
Many services expect server-to-server calls, NOT calls from a public browser.
So, how do you get around it?
Some tips:
Confirm it's truly CORS - Open DevTools (f12), go to the Network tab, check the failing request. Look for missing
Access-Control-Allow-Originheaders or blocked preflightOPTIONSrequests.Try server-side routing (my preferred strategy) - Move the external API call into N8N, expose a webhook, and return only needed data to the client. This usually circumvents the issue.
Keep auth headers server-side (e.g., n8n webhook) so the browser never exposes secrets and returns sanitized JSON to the client.
Retest with minimal requests - Start with a basic call, then layer in authentication, headers, and bigger payloads once the basic call succeeds.
The n8n webhook approach solves most CORS headaches because we're making server-to-server calls instead of browser-to-server calls. The browser only talks to your own webhook, which doesn’t trigger CORS restrictions.
21. Use Expo Go if You Want to Build a Mobile App Quickly
React Native with Expo enables you to prototype mobile apps quickly and test them instantly on your phone. I’ve been able to get it going on the mobile app but publishing to the App store is a different story. There are Youtube tutorials for Replit apps though.
To get started, navigate to the Expo Go template: https://replit.com/@replit/Expo?v=1#README.md.
Simply hit Remix and then “Run” to get it running, then use the Assistant to customize your app.
Here's a tutorial if you need it:
22. Protecting your database with RLS (row-level security)
Databases are simple to setup. Lovable has a Supabase integration and Replit uses it’s own native database with Postgres. It takes a couple of simple prompts to setup.
The challenge that I wasn’t privy to was a little thing called RLS (row-level security).
In simple terms, RLS (Row Level Security) in Supabase is like your database's bouncer. It controls who can see which data rows based on rules you set up.
If you’re building an app with multiple user types and you need to comparmentalize their info, you need some RLS basics to get by.
The way I think about it:
RLS is database-level security - Rules apply no matter how data is accessed (API, direct queries, client apps)
Two user types -
anonis used for logged-out users,authenticatedis used for logged-in usersRequired for public tables - Any table users can access must have RLS enabled to prevent data leaks
Policies control access - SQL rules that filter which rows users can see or change
Works with Supabase Auth - Uses
auth.uid()to identify the current user
Here’s the step by step:
Your Supabase instance will probably have RLS enabled.
If you’re working with a multi-tenant SaaS, ensure you have policies like these set up:
Create a basic policy so users only see their own data:
CREATE POLICY "Users see own data" ON your_table
FOR SELECT USING (auth.uid() = user_id);
Allow users to insert their own data:
CREATE POLICY "Users insert own data" ON your_table
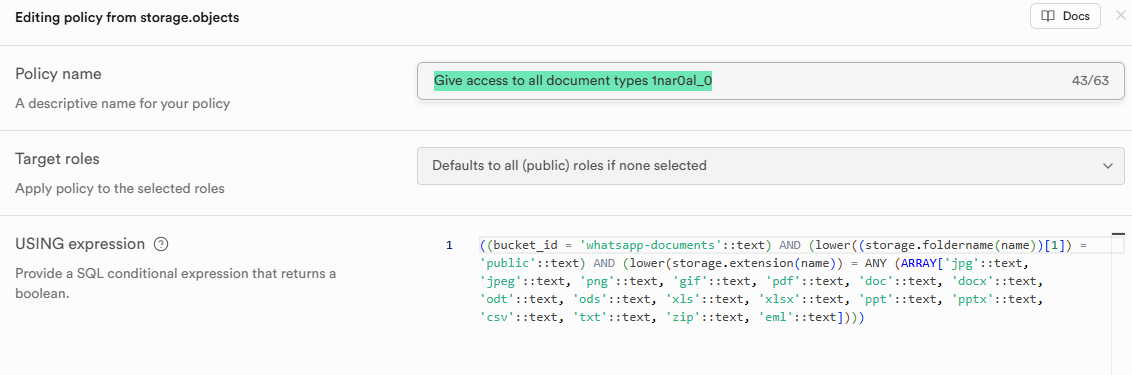
FOR INSERT WITH CHECK (auth.uid() = user_id);The problems I encountered were when I needed to provide public access to some images stored in my Supabase buckets to unauthenticated users.
If you use storage buckets for public assets, create explicit storage.policies for read access. Don’t make the bucket public by default:
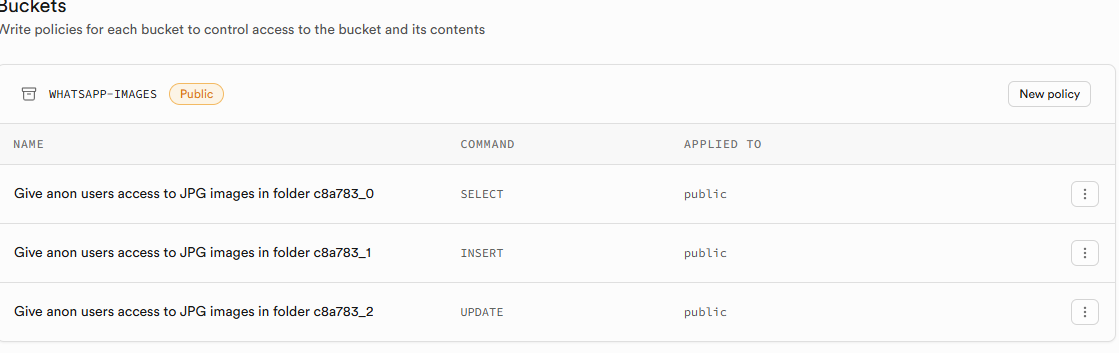
The best approach is to ask ChatGPT to write the policy for your storage objects for you (based on your rules). Then, manually apply it in Supabase across the select, insert, and update queries.
Don’t underestimate RLS. It’s important if you’re taking your prototype to 50-100 users for concept validation.
23. Keep all secrets and credentials in Environment Variables
Never hard-code API keys, tokens, or passwords directly in your code. This is a security disaster waiting to happen.
Use .env files or your platform's environment secrets system (Replit secrets, Cursor .env files). Most AI tools will automatically prompt you for this, but they might skip on it for certain APIs.
Ask your AI tool to generate code that reads sensitive data from environment variables instead of inline text. For example, use process.env.API_KEY instead of pasting the actual key in your code.
Another tip: after building features, bring your code to Cursor, switch on O3 and ask it to do a small security audit:
"Act as a senior developer. Review this authentication flow for security vulnerabilities and suggest improvements."Since we’re not going full-blown production yet, even getting the basics right will suffice.
Phew.
My fingers are burning right now, so I’m going to wrap this up now.
Here are a few honorable mentions from my tip list in no particular order:
Common Mistakes and Prevention
You're not building Google. Focus on velocity over perfection. Get something working and iterate based on real usage.
Vibe coding is about momentum. Ship fast, learn fast, improve fast.
Big features need decomposition. Authentication system becomes: 1) Login form, 2) Registration flow, 3) Password reset, 4) Session management.
Patience with sequential building saves debugging time later.
Mobile-first design prevents desktop-to-mobile responsive nightmares. Start with mobile layouts and scale up.
Commit every working feature. Create branches for experimental changes. Git saves more time than any prompting technique.
Your first project will be messy. Your third will be decent. Your fifth will surprise you with its quality. I rebuilt vouchtribe's architecture twice. Homepare's comparison logic three times. Each iteration taught me something new.
Follow vibe coding communities on Reddit, Discord, and Twitter. Other builders share solutions to problems you haven't encountered yet.
Document your own mistakes. Create a "common AI mistakes" file and reference it in new projects.
Factor AI tool costs into project budgets. Replit Pro, Cursor subscriptions, API usage for ChatGPT or Claude add up pretty quickly. There’s an opportunity cost.
Compare this to hiring developers or agencies. The cost-to-value ratio still heavily favors vibe coding for MVP development.
Final word
Vibe coding is a bumpy road.
My first prototype was a total dumpster fire. Now, I can crank up a functional app in a few days with some focus.
My journey was certainly not smooth, but with every broken deployment, every debugging session, and every "why isn't this working?" I learnt something new and got better at it.
Welcome to the new era of product development.
Time to start building. You’ve got this.
Till next time,
Aatir
Thanks for sharing.
It's been a real pleasure to walk through this stack 💪🔥